Monday, October 21, 2013

Taking a Breather

Nothing like putting something on your bike that's simple as can be like this breather cover. It gives me a little confidence boost knowing I made progress & nothing is screwed up (and if even if it was, correcting it doesn't mean splitting the case or something crazy like that).


I should add these before pics more often as a reminder how far I've come. Its easy to get discourage knowing how much more there is to do. I love how the twigs in the picture give it the "left outside basket case" vibe.


Friday, October 18, 2013

Valve lapping

Pulled the old valve oil seals off with a pliers. These wear out so might as well replace them when ever the valves are out.
 
 
New Vitan synthetic rubber seals.


Just a few pics of carbon build up.


These dremel pads are awesome.
 
 
Used two Permatex grinding compounds (course & fine) on the valves and seats.


After a few minutes on each seat, this was the result. Those look like pits, but I think they are just carbon spots. I ran my finger nail along the seats and it felt very smooth. I really didn't feel like paying for a valve job if they didn't need it


So I kept at it with the lapping tool for a little bit more and most of it came off. I didn't do any fancy measurements. They look good to me!
 
 
Homemade valve compressor with a big C clamp and socket. Pretty tight spot to get the keepers in there by the purple arrow. First one took forever, but I got the hang of it after that.


This was my test to see if the valves formed a nice seal with the seats. I stood the head on its side and filled the ports with break cleaner. Its not a full proof method, but its better than nothing. All the valves held the break cleaner.
 

 No leaks!!!


Thursday, October 17, 2013

DIY Rust Coating

Ok, so previously I mentioned some rusty parts that were not rusty before I did something idiotic. For some reason, I thought having nice clean & shiny case bolts was important so I tried a DIY zinc coating process much like this one.


You can google how to do it so to make a long story short, my first attempt was a complete failure. There was a reaction taking place on the bolts, but when I removed them they looked like crap. Maybe I hadn't cleaned them enough? I gave it a few days and was about to try again when my stomach tied up in knots. Every piece of steel around my workbench was covered with surface rust (the whole transmission sitting in the crankcase, other engine parts, tools, you name it). I literally couldn't see straight. Everything looked ruined.
 
After regaining my senses, I started to wipe everything down with motor oil over and over again. Most of the surface rust came off. Apparently one of the gases from the chemical bath reacted with the steel causing a flash rust. If you do this, do it far away and in a well ventilated area.
 
More more zinc plating for me!

Wednesday, September 25, 2013

Clutch time.

I busted this threaded hole in the clutch hub a long time ago. Its in an earlier post.
 
 
Replacement from ebay. 
 
 
Cleaning clutch plate. Exciting, no?
 
 
Clutch plates. I'm staying with the old ones. 

 
The other end of the clutch push rod sticking out of the clutch housing.

 
Time to bring out the big guns to torque the clutch hub on.

 
This washer needs to be put on a certain way because its curved. I think its stamped/labeled on one side. Just follow the manual!
 
 
Behold the clutch tool! Another ebay purchase. Trying to do this without this tool is how I broke the first hub. I let the tool press against the bench top when torqueing so I don't have to hold it at the same time.


Finishing touches. You can see the plate edges stacked inside and the clutch springs are under the bolts.

 
I applied a little engine oil to the gasket first. Some people do this (or use grease) to keep the gasket from sticking to the surfaces. Supposedly you won't have to scrape next time the covers come off. 


Socks, kick & shift.

Could I be the first to invent this re-building trick/technique? I dunno, but I'm kind of proud about it! Socks over the studs to keep stuff from falling into the case. I got rags stuffed in there too to be safe. I dropped a ton of stuff down there when I was tearing her down. 
 
 
Kick shaft on. I forgot to take pictures. Inside the cover is a stiff spring that keeps the kick shaft pressed against that tab where my first busted bolt was (the spring spins the shaft to the left). This disengages a gear on the kick shaft. When you kick start it, the shaft spins in the opposite direction (to the right) and the gear engages with the transmission which in turn rotates the crankshaft.

 
This is part of the shift mechanism. The spring needs to be placed just like in the picture below. It took awhile of researching the net to make sure this is the correct way to place the spring. The manual isn't very clear.  
 
 
In place. The shaft is what you turn with your foot when shifting. The black painted ring is the end of the shift drum and just behind said ring are pegs that those hooks grab onto to rotate the drum. 

 
The clutch push rod.


The cover for this area. The purple circle is where I snapped off part of the chain guard trying to get the sprocket bolt off way back when and the yellow is for the neutral indicator dash light. I'm not going to need this light so I'll pull that off later on and screw in a plug of some kind. Less wires and clutter the better! This is going to be very lean machine.

 
Just an O-ring that might get looked over if you are not careful (I think that's where it goes!)

 
Cover going on. The manual says to use a special tool for those black circular oil seal thingies in the cover when you put it on. I skipped that part. Seems fine.
 

Split the case AGAIN.

Call it luck, karma or whatever. Late one night I happened to be looking at kz750 engine pics on the net out of boredom. Some how, I noticed a tiny detail in another re-build project. The circle below is where I noticed the difference. On the other project, something was on the shiny metal peg. I knew my engine didn't look like that. After spending so much time on this crankcase, I know it like the back of my hand. Since my case was together, I had to go back and look at some old pics to verify what I had noticed. Sure enough, I never put the chain tensioner guide on! The reason was because this part is in the cam shaft parts diagram. Why would I be looking there when I'm still working on the crankcase?
 
Oh well. Its a pain in the ass to open it up a second time, but at lease I noticed it when I did.
 
 
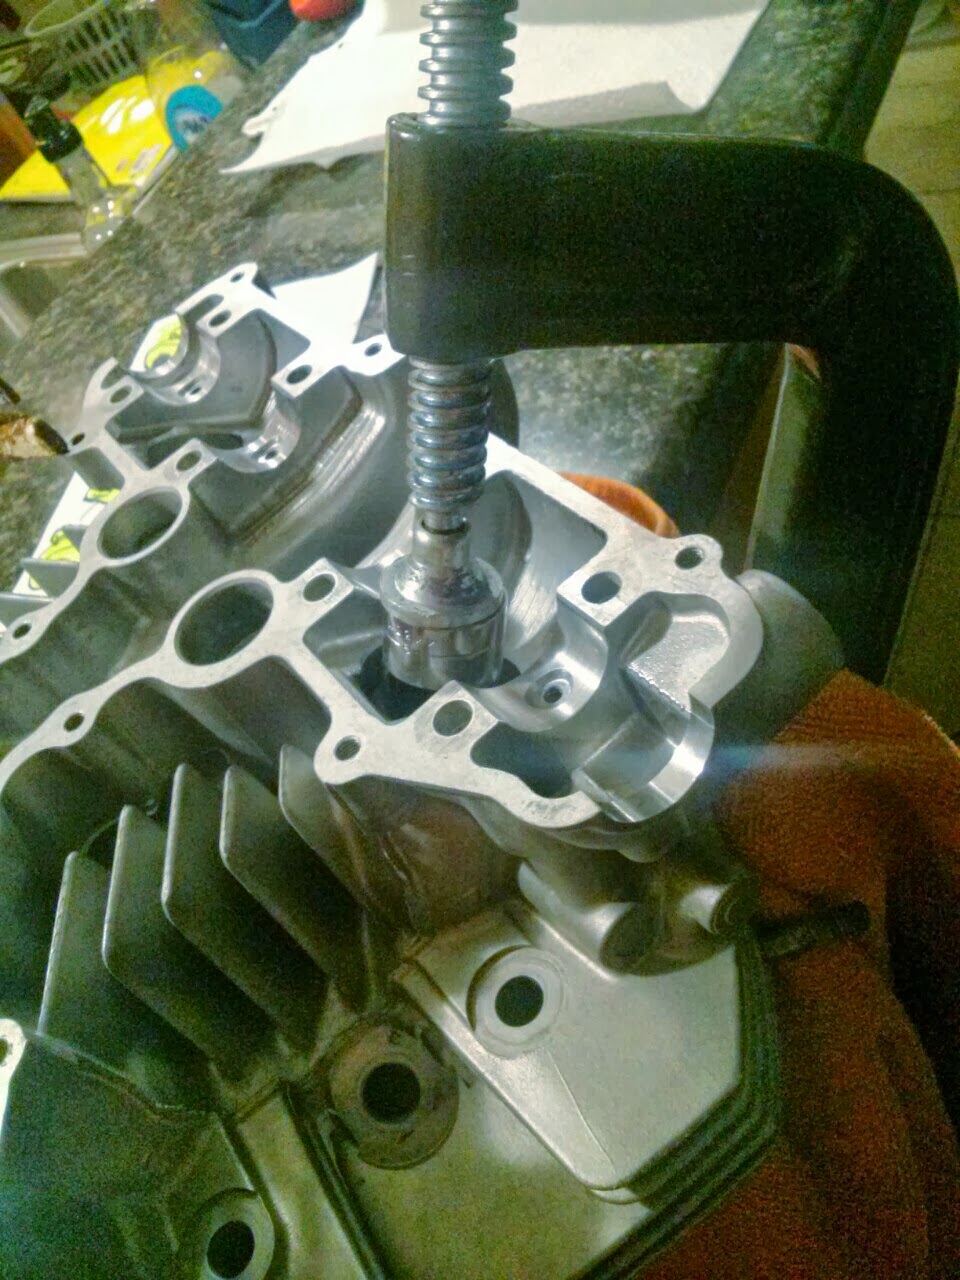
I snapped this after I opened it up (for a second time, mind you). Yep, no cam chain tensioner guide where it should be. Also, notice the nice brown rust on it? It was shiny before. I'll get to that later... 
 
 
The end circled below fits onto that peg.
 

There she is, right where she belongs. Now I get to put the transmission in, the crank shaft in, spread liquid gasket around and mate the halves AGAIN. At least its good practice. I can do it with my eyes closed now.


Busted Again!

 
Yep, I did it again. This time with a case bolt. Fortunately it came out rather easy. I used a plain left handed drill bit, worked it for a minute and it backed out. PHEW! I can now proudly say after 2 busted bolts that I'm an owner of 3 different torque wrench sizes to get the job done right.
 

Scraping of the liquid gasket so I can do it all over again. At least it looks like I had put just the right amount on. Why there is a play mat and a nerf gun in this pic, I have no idea.

 
Just a pic of the oil pump in place.

 
Putting the oil pan on. This looks like a rusty bolt (and I thought it was), but its actually dirt and grime. I had completely forgotten how dirty this engine really was. The oil pan once looked like this bolt!

 
 And now she's on and the engine flipped right side up finally.