Wow. Where does the time go?
I have not given up, but I also don't have much progress to report either. VooDoo Vintage in Austin TX is hardtailing the frame for me right now. That will save me time plus get my ass motivated to finish the rebuild. Dave at VooDoo is a great guy and a great craftsman. He wants to sell kz750 hardtail kits and he's using my frame for the prototype.
I'm just starting to put the motor back together. I'm really over my head and the shop manual isn't detailed enough for me. But onward we must go!
I'll post updates soon!

One month before I started this restoration bobber project, I knew next to nothing about motorcycles (or engines for that matter). Camshaft? No clue. Petcock? Sorry. But I did know that the piston goes up & down so that at least was something. I also knew this: No matter how long this takes, I will one day ride a kickass custom hand-built kz750 hardtail bobber.
Friday, June 28, 2013

Monday, October 10, 2011
DIY Blast Gun
I ordered some rubber trim and special "glass locking" trim from McMaster Carr for the blast cabinet. If you've never ordered from McMaster Carr, you should check out their web site. The best industrial supply web site hands down.
While waiting for the trim, I took a closer look at a cheap blast gun I bought. Its kind of clunky.

My blast cabinet is a little small so maybe I can make something better with this little blow gun.

Below is a 1/8" pipe tee fitting, a 1/8" pipe/tube adapter and the tip from the small blow gun.

Fit them all together and we've got a nice little blasting gun.

While waiting for the trim, I took a closer look at a cheap blast gun I bought. Its kind of clunky.
My blast cabinet is a little small so maybe I can make something better with this little blow gun.
Below is a 1/8" pipe tee fitting, a 1/8" pipe/tube adapter and the tip from the small blow gun.
Fit them all together and we've got a nice little blasting gun.
Friday, October 7, 2011
DIY Soda Blaster
Now that the engine is completely apart, I started thinking about how to clean it. At first I though that I would have to scrub and scrub with a solvent until she shined up. In the mean time, I also was learning about soda blasting. Soda blasting is probably the safest way to blast because its almost completely harmless to the engine. It doesn't remove metal and it dissolves in water so clean up is a breeze. Not only that, you can Do It Yourself.
Sounds like a plan!
The two large holes will be where my arms go. The smaller one on the side will be where my shop vac hose goes. It will simply suck out all the left over soda, dirt & dust. The plastic bin maybe a little smaller then the ideal, but I should be able to fit all the engine parts in there.

Now I'm making holes for the air hose and the media blasting hose.

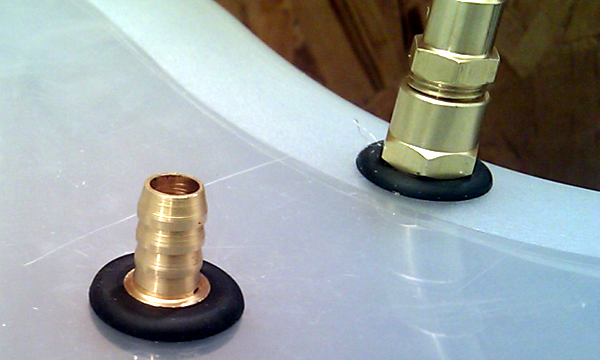
I love grommets. These two fittings are snug as can be in there. The barbed fitting is for the blast media and the larger fitting is a quick connect fitting for the air hose. Doing it this way with the pass thru fittings will make this really portable and convenient to use. "Plug and play", if you will.
Air hose inside the blast "cabinet".

Blast media hose in side the blast cabinet.

Hole cut on top for the window. I need to get some nice rubber edging for these larger openings. This is gonna look really nice when its done!

Sounds like a plan!
The two large holes will be where my arms go. The smaller one on the side will be where my shop vac hose goes. It will simply suck out all the left over soda, dirt & dust. The plastic bin maybe a little smaller then the ideal, but I should be able to fit all the engine parts in there.
Now I'm making holes for the air hose and the media blasting hose.
I love grommets. These two fittings are snug as can be in there. The barbed fitting is for the blast media and the larger fitting is a quick connect fitting for the air hose. Doing it this way with the pass thru fittings will make this really portable and convenient to use. "Plug and play", if you will.
Air hose inside the blast "cabinet".
Blast media hose in side the blast cabinet.
Hole cut on top for the window. I need to get some nice rubber edging for these larger openings. This is gonna look really nice when its done!
DIY Valve Compressor
I tried my 4lb dead hammer to knock the valve keepers lose. Didn't work at all. Is it just me or are these kz750 valve springs really really strong? I'd whack it with the dead hammer and the spring wouldn't compress at all.
So I followed what many do to make a valve spring compressor- cut a notch in a socket and use a c-clamp.

In use. At the center, you can see one valve keeper in place. The other fell off and is sitting behind the valve stem.

I knew it would be a tight squeeze. This was the longest socket I had to spare so the notch isn't very big. Just like playing the game "Operation" as a kid. "It takes a steady hand!"

But I got them all out, and everything looks okay to me. I know later on the valves will need special attention.

So I followed what many do to make a valve spring compressor- cut a notch in a socket and use a c-clamp.
In use. At the center, you can see one valve keeper in place. The other fell off and is sitting behind the valve stem.
I knew it would be a tight squeeze. This was the longest socket I had to spare so the notch isn't very big. Just like playing the game "Operation" as a kid. "It takes a steady hand!"
But I got them all out, and everything looks okay to me. I know later on the valves will need special attention.
Thursday, September 29, 2011
Spit Across the Middle
Time to get the crank case split. But let's not get ahead of ourselves here. There 23 bolts holding it together yet.

23 bolts later, I was able to crack it open at a pry point. I was worried that this would be hard to split, but these two pieces used a liquid gasket so it was pretty easy.

I'm not in the clear yet. That damn stuck piston is a thorn in my side. The upper case was blocked because the pin was sticking out. So on goes the DIY pin puller, but now I'm packing some heat this time around.

It worked. I got the pin out just enough to remove the piston. Here's a picture of the piston with the pin still partially in it. What's the brown scarring?

Gears!


23 bolts later, I was able to crack it open at a pry point. I was worried that this would be hard to split, but these two pieces used a liquid gasket so it was pretty easy.
I'm not in the clear yet. That damn stuck piston is a thorn in my side. The upper case was blocked because the pin was sticking out. So on goes the DIY pin puller, but now I'm packing some heat this time around.
It worked. I got the pin out just enough to remove the piston. Here's a picture of the piston with the pin still partially in it. What's the brown scarring?
Gears!
Monday, September 26, 2011
Pan Down
I'm still mostly following the shop manual (if I get stuck on something I skip ahead), and next up is the oil pan. I'm excited about this one because the inner guts of the engine will finally get exposed (from underneath anyway).
The 17 bolts came off easy, but the pan was stuck. I tapped with a hammer and prodded with a screw driver, but it wasn't going to come off that easy. The ever resourceful forums suggested (among other things) a 4 pound "dead blow hammer". This is essentially a heavy duty rubber mallet as I found out later when I purchased one. I'm trying to be a bit more careful and get the right tool when I can.
After several strong swings and whacks all around the oil pan, she just suddenly flopped straight down.

It wasn't too bad in there. The oil was thick and black. There were also some small bits of metal and whatnot in there. I know its not a good sign to have a lot of metal bits in the oil pan, but isn't it normal to have at least some? This may have been the first time the pan came off too so maybe its just from breaking the engine in.
You can see them below. They look much bigger covered in oil than they really are after washing them off. Not all of them are metal. Some of it is just grime falling from above through the cylinders.

And cleaned up a bit. Man, I can't wait to get the rest of the engine squeaky clean! I'm getting tired of grime everywhere.

The oil pump.

Here's a shot of what's under the breather cover. I believe both the out gassing vent and the intake breather are both in here. Some bikes have them located at different spots on the engine.

Getting really close to splitting the rest of the case wide open and pulling out the gears and stuff. I can't wait!
The 17 bolts came off easy, but the pan was stuck. I tapped with a hammer and prodded with a screw driver, but it wasn't going to come off that easy. The ever resourceful forums suggested (among other things) a 4 pound "dead blow hammer". This is essentially a heavy duty rubber mallet as I found out later when I purchased one. I'm trying to be a bit more careful and get the right tool when I can.
After several strong swings and whacks all around the oil pan, she just suddenly flopped straight down.
It wasn't too bad in there. The oil was thick and black. There were also some small bits of metal and whatnot in there. I know its not a good sign to have a lot of metal bits in the oil pan, but isn't it normal to have at least some? This may have been the first time the pan came off too so maybe its just from breaking the engine in.
You can see them below. They look much bigger covered in oil than they really are after washing them off. Not all of them are metal. Some of it is just grime falling from above through the cylinders.
And cleaned up a bit. Man, I can't wait to get the rest of the engine squeaky clean! I'm getting tired of grime everywhere.
The oil pump.
Here's a shot of what's under the breather cover. I believe both the out gassing vent and the intake breather are both in here. Some bikes have them located at different spots on the engine.
Getting really close to splitting the rest of the case wide open and pulling out the gears and stuff. I can't wait!
Wednesday, September 21, 2011
Piston Pin Problems
A few weeks back, the left piston slipped right out with a few taps of a hammer. Not so for its sister, (or should I say evil twin). The right one didn't budge. I smacked it good with a hammer a few times. Nothing. And yes I have the circlips out.
So now I've made a piston puller and tried that. Yes! The pin is sliding out (with lots of torque applied).

But after an inch or so, she didn't want to cooperate anymore. I really cranked on the puller and she just won't move. Is this normal?

And once again, I chipped off some aluminum. This stuff is more brittle than a rose dipped in liquid nitrogen. The large socket dug into the piston just above the pin as seen in the picture above. At that point, I didn't really care. I just wanted the piston pin out. I can always get a new piston.
So now what?
I know some mechanics and bike enthusiasts out there are cringing. I look at at this as a learning experience. I'm not afraid to make mistakes, just as long as I learn from them. Besides, even if I turn this into a parts bike, I'll consider it the best small engine repair course that $300 can buy.
I'm going to make a running list of all the stuff I break (for fun and for motivation to be more careful).
1. Chipped piece off engine case (cosmetic)
2. Chipped piece off clutch hub (may need replacement)
3. Chipped piece off right piston (will need replacement)
4. ?
So now I've made a piston puller and tried that. Yes! The pin is sliding out (with lots of torque applied).
But after an inch or so, she didn't want to cooperate anymore. I really cranked on the puller and she just won't move. Is this normal?
And once again, I chipped off some aluminum. This stuff is more brittle than a rose dipped in liquid nitrogen. The large socket dug into the piston just above the pin as seen in the picture above. At that point, I didn't really care. I just wanted the piston pin out. I can always get a new piston.
So now what?
I know some mechanics and bike enthusiasts out there are cringing. I look at at this as a learning experience. I'm not afraid to make mistakes, just as long as I learn from them. Besides, even if I turn this into a parts bike, I'll consider it the best small engine repair course that $300 can buy.
I'm going to make a running list of all the stuff I break (for fun and for motivation to be more careful).
1. Chipped piece off engine case (cosmetic)
2. Chipped piece off clutch hub (may need replacement)
3. Chipped piece off right piston (will need replacement)
4. ?
Subscribe to:
Posts (Atom)