Wednesday, September 25, 2013

Clutch time.

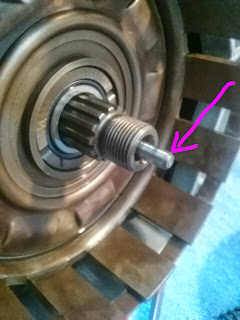
I busted this threaded hole in the clutch hub a long time ago. Its in an earlier post.
 
 
Replacement from ebay. 
 
 
Cleaning clutch plate. Exciting, no?
 
 
Clutch plates. I'm staying with the old ones. 

 
The other end of the clutch push rod sticking out of the clutch housing.

 
Time to bring out the big guns to torque the clutch hub on.

 
This washer needs to be put on a certain way because its curved. I think its stamped/labeled on one side. Just follow the manual!
 
 
Behold the clutch tool! Another ebay purchase. Trying to do this without this tool is how I broke the first hub. I let the tool press against the bench top when torqueing so I don't have to hold it at the same time.


Finishing touches. You can see the plate edges stacked inside and the clutch springs are under the bolts.

 
I applied a little engine oil to the gasket first. Some people do this (or use grease) to keep the gasket from sticking to the surfaces. Supposedly you won't have to scrape next time the covers come off. 


Socks, kick & shift.

Could I be the first to invent this re-building trick/technique? I dunno, but I'm kind of proud about it! Socks over the studs to keep stuff from falling into the case. I got rags stuffed in there too to be safe. I dropped a ton of stuff down there when I was tearing her down. 
 
 
Kick shaft on. I forgot to take pictures. Inside the cover is a stiff spring that keeps the kick shaft pressed against that tab where my first busted bolt was (the spring spins the shaft to the left). This disengages a gear on the kick shaft. When you kick start it, the shaft spins in the opposite direction (to the right) and the gear engages with the transmission which in turn rotates the crankshaft.

 
This is part of the shift mechanism. The spring needs to be placed just like in the picture below. It took awhile of researching the net to make sure this is the correct way to place the spring. The manual isn't very clear.  
 
 
In place. The shaft is what you turn with your foot when shifting. The black painted ring is the end of the shift drum and just behind said ring are pegs that those hooks grab onto to rotate the drum. 

 
The clutch push rod.


The cover for this area. The purple circle is where I snapped off part of the chain guard trying to get the sprocket bolt off way back when and the yellow is for the neutral indicator dash light. I'm not going to need this light so I'll pull that off later on and screw in a plug of some kind. Less wires and clutter the better! This is going to be very lean machine.

 
Just an O-ring that might get looked over if you are not careful (I think that's where it goes!)

 
Cover going on. The manual says to use a special tool for those black circular oil seal thingies in the cover when you put it on. I skipped that part. Seems fine.
 

Split the case AGAIN.

Call it luck, karma or whatever. Late one night I happened to be looking at kz750 engine pics on the net out of boredom. Some how, I noticed a tiny detail in another re-build project. The circle below is where I noticed the difference. On the other project, something was on the shiny metal peg. I knew my engine didn't look like that. After spending so much time on this crankcase, I know it like the back of my hand. Since my case was together, I had to go back and look at some old pics to verify what I had noticed. Sure enough, I never put the chain tensioner guide on! The reason was because this part is in the cam shaft parts diagram. Why would I be looking there when I'm still working on the crankcase?
 
Oh well. Its a pain in the ass to open it up a second time, but at lease I noticed it when I did.
 
 
I snapped this after I opened it up (for a second time, mind you). Yep, no cam chain tensioner guide where it should be. Also, notice the nice brown rust on it? It was shiny before. I'll get to that later... 
 
 
The end circled below fits onto that peg.
 

There she is, right where she belongs. Now I get to put the transmission in, the crank shaft in, spread liquid gasket around and mate the halves AGAIN. At least its good practice. I can do it with my eyes closed now.


Busted Again!

 
Yep, I did it again. This time with a case bolt. Fortunately it came out rather easy. I used a plain left handed drill bit, worked it for a minute and it backed out. PHEW! I can now proudly say after 2 busted bolts that I'm an owner of 3 different torque wrench sizes to get the job done right.
 

Scraping of the liquid gasket so I can do it all over again. At least it looks like I had put just the right amount on. Why there is a play mat and a nerf gun in this pic, I have no idea.

 
Just a pic of the oil pump in place.

 
Putting the oil pan on. This looks like a rusty bolt (and I thought it was), but its actually dirt and grime. I had completely forgotten how dirty this engine really was. The oil pan once looked like this bolt!

 
 And now she's on and the engine flipped right side up finally.


Tuesday, September 17, 2013

Two halves become one (finally!!!)

Here are the larger crankcase bolts that go by the crank shaft. They look 30 years old! I found with trial and error that Eagle One Mag Wheel Cleaner works wonders on old bolts. It has acids that eat the rust off. Be careful because it will also eat zinc plating right off. I don't have a picture, but the bolts are now very clean with a dull grey color.
 
On a side note, I tried to re-zinc plate these bolts with disastrous results- a story I'll save for later.  
 

Making sure I know where everything goes and that I have not lost anything.

 
I'm using Permatex Ultra Black for the crankcase gasket by the way. I don't have any pictures of putting it on because I was too focused (and nervous) on doing it right. I had to spread it around with my finger because its impossible to lay smooth bead through all the intricate surface areas.
 
Its a pain setting the bottom case onto the top (engine is upside down) because there a several parts that need to be aligned like the balancers, balancer chain & crank shaft. The balancer chain tensioner was always getting in the way too. In the end, I think I got it right.

You want to slightly tighten the crankcase bolts until you see it squish out between the halves. Then wait for a bit so it can "thicken". After that you can torque it down. 
 

Next post, I'll tell you how I busted another bolt torqueing the crankcase together. Yay!  


A Work of Art

Here's are two little parts that might get missed. There are two very small oil nozzles on the upper crankcase where the drive and output shafts go. make sure these passages are clear.


Here are my attempts at art. I think its kinda cool.